Fitbit SimpleHome Operations
(last update 2025-05-16 Version x.3.06 [Versa 1/2/3/4 & Sense 1/2])
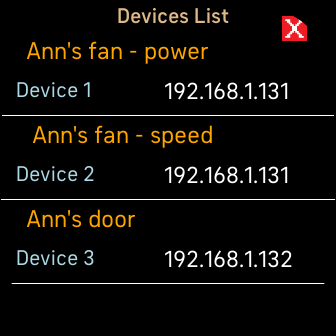 Defined devices list view |
 Main Operating a device view |
Operating SimpleHome
The SimpleHome app can control up to 32* devices accessible directly on your network, or functions via Home Assistant or other services. [* Not all models support that many devices] As Google Assistant functions are being removed from Fitbit watches, SimpleHome can sometimes be a good alternative. It will work with anything that uses a simple RestFul API interface (see section below) When SimpleHome is started on the watch it will show a splash screen to ensure it is properly connected.
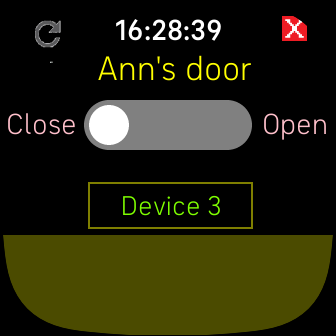
If not connected, tap the screen to try again. If this doesn't work resolve the watch-phone connection issue. Your phone needs to be nearby and be able to sync to use SimpleHome. If the watch cannot connect SimpleHome obviously cannot be used. Operations give tactile feedback to know that it is working. It is important to wait till the watch stops vibrating before starting another operation. Also as the operation parameters can be complex please see the troubleshooting section to help eliminate possible mistakes. Devices List view If there are sufficient devices in the Devices List it is scrollable. It will reflect changes made in the Gallery tile as they are made if it is syncing properly, after a little pause, be patient. Tap on a particular device to select that one, or tap on the red X to return to the main operating view with the previously selected device, without having to select it again. Pressing the Back button will immediately Exit the SimpleHome app. Main operating view Pressing the Back button will immediately Exit the SimpleHome app. Or tap the red X on the main view to Exit the SimpleHome app and provide version and other useful information. Tap the square with the Device number shown in the main view to change to the Devices List view to select another device. At that point all the details for that device can be consulted or modified on the phone. Tap the Refresh icon [top left] to get the current state displayed, in case there has been a change, the toggle button will show the current state after a few seconds, if this is supported and properly configured. Tapping the toggle button will change the state after a few seconds. Tapping the State change buttons [Close/Open in the example] will issue the command for that state directly. The toggle button will follow, if relevant. The yellow bottom area displays the status of any relevant information. Tap it once to hide it or recall it. The results of an operation, if any, can be seen and for helping troubleshooting the URL used, it can be shown by tapping it again. Operating timeouts - IMPORTANT SimpleHome will continue to run for 5 minutes after the last update from the Fitbit App Settings or last manual operation on the watch. SimpleHome display will stay on for 30 seconds from the last display operation or when a change is made on the phone, providing the watch is not in Sleep mode. SimpleHome closes and returns to the last clock face when the timeout is reached and any changes made in the Fitbit App Settings will be discarded. Only changes made when SimpleHome is running are accepted. Setting up SimpleHome
All settings for the SimpleHome app are done on the phone. Setting it up - required for it to work
When adding a device it clones the already selected device. Important 1) If you want to setup any old device use ANY for DeviceMake and this will remove the unwanted options incurred from a previous device. 2) The absence of certain strings enables defining
each device to be with or without certain action buttons or Toggle
button, so makes each device configurable to the need. 3) It's possible to make a device multiple times, each for a different need. Configuring a device Complete the "Device Identity details" as follows Name or Service of device [~20 characters max]
HTTP or HTTPS addressing
DeviceMake
Device IP - [no trailing '/'] [default is 192.168.1.0, must be changed]
Operating mode
Device Strings - [no leading '/'] - Note: For any complicated strings, especially those with embedded keys, codes, webhooks, pre-assemble them in an editor [such as Keep or Notes] and test them in the browser by combining your choice of <HTTP>://<Device /IP>/<string>. This will speed up configuring SimpleHome and keep a record of all elements. For DeviceMake set to Any complete as as follows
Such as "relay/0?turn=on" or "api/webhook/<function name>"
A query command is issued if a device is selected from the Device list view on the watch or the Refresh icon is tapped. It is used to set the toggle switch to indicate whether the device is off or on. To do this the Query report is analysed and compared with the strings provided to show the correct information. So enter the unique strings appropriately. A good way to determine what values to put is to use your browser to set state 1 and run the query to find the relevant string and again for state 2.
The yellow status windows will show any returned results from mode changes or the Query operations. If there is too much information to fit use the "More" button to scroll the whole results string. Switch between results, URL used or nothing by tapping the yellow zone.
Note: If the device / service doesn't have a return status capability it is important to enter nothing for the Query command and this will disable the check process. Note: It is possible to operate a device or service with different modes by adding it as multiple 'devices" in the list but with different options. Connectivity - [requirements for the SimpleHome app to work]
|

Phone Settings
 |
| The watch and phone must be connecting before any changes can be made in the Settings on the phone. Generally a manual sync will help By selecting a device from the Devices List on the watch the device definitions can then be configured in the phone Fitbit App, Gallery tile, SimpleHome settings. A device can be deleted, edited or another device can be added using the options at the top. Editing is done by selecting the appropriate field, clicking in the field and making the change and saving. The changes will be reflected on the watch face. Start by giving a good description for the name, note there is limited space, so not too long. Add the IP address of the device or base website address without the http(s):// or trailing '/'. Use DeviceMake to select Any or if Shelly, myStrom or others are selected the other fields may be pre-filled or need to be changed manually. They can be modified any time to suit your particular device or command structure, and if Any is selected they must be entered manually. If any operations are not working tap the yellow bottom area to check for errors in setting up the parameters - it will display the url used and this can be checked in some cases by issuing the same command from a browser. |
Troubleshooting
| Please note some iPhones and iOs versions won't permit all operations. There are 2 basic components to the app, one which runs on the watch, the other on the phone, check the following: The Fitbit App
If other non supported LANs are needed see MacroDroid Proxy After each of the above checks remember to tap the on SimpleHome app Refresh icon to see if it is working. If not stop and start the SimpleHome app again. If you think the parameters are right and it is still not working, try the string as shown in the bottom status, in your browser [except for SonoffDIY] or Telegram Save]. This enables to check you have the correct settings and to ensure they are inserted in the app correctly after. To do this, check the yellow status area at the bottom shows the same command that was entered in the browser. It is a good idea to record each of the Restful API calls in a notepad, for reference and verification, and to speed up inputting the parameters before a timeout occurs. Patience is needed as it takes time to load the data, especially when waiting confirmation of a change. If the watch doesn't vibrate when tapping an icon, as they are small, it may be necessary to try tapping again in the exact right place. The SimpleHome app can be used without accounts, logins, fees or restrictions. Exiting: Exiting the app, there is a slight pause to allow time to save the configurations. SimpleHome will close automatically after a certain time of inactivity. This may happen if setting up the parameters takes a long time, or the watch may also stop syncing. Once this happens any configurations changes made on the phone will have no effect on the watch and will be lost next time SimpleHome is started.
Raw API commands (for devices)
Any
Can be for any type of device other than those listed and in which case has no specific default values
Shelly http://192.168.1.132/relay/0?turn=on http://192.168.1.132/relay/0?turn=off http://192.168.1.170/relay/0 Status off "ison":false on "ison":true myStrom http://192.168.1.131/relay?state=1 http://192.168.1.131/relay?state=0 http://192.168.1.131/report Status off "relay": false on "relay": true MacroDroid https://trigger.macrodroid.com/<deviceid>/macro 1 https://trigger.macrodroid.com/<deviceid>/macro 2 https://trigger.macrodroid.com/<deviceid>/request Status user defined Setting up MacroDroid [EG. request phone battery level]
Note: names are case sensitive, action is unidirectional example: TroubleShooting unsupported local addresses It is possible to run using unsupported [by Fitbit] local LANs To do that you can use MacroDroid Proxy to reach devices that are not on a supported LAN. The example shows how to set it up but first try the previous example to make sure macros work. Home Assistant [HA] Using webhook [only for commands] https://192.168.1.42:8123/api/webhook/SimpleHome1 https://192.168.1.42:8123/api/webhook/SimpleHome2 https://192.168.1.42:8123/api/webhook/SimpleHome3 Using AppDaemon [which can give an answer back] http://192.168.1.42:5050/api/appdaemon/SimpleHome1 import hassapi as hass class API(hass.Hass): def initialize(self): self.register_endpoint(self.my_callback, "SimpleHome1") def my_callback(self, data, **kwargs): return {"message": "Hello World, SimpleHome1 called"}, 200 Status user defined For an interactive Restful API response see Home Assistant Setting up HA Configure a webhook triggers in HA, like
Note: names may be case sensitive See useful API link What can it be used for? You can send messages to Telegram, for example to record an event You can save a copy of your Device settings for reference and checking If you select Telegram as DeviceMake it will pre-fill with the following which you need to complete https://api.telegram.org bot<Token>/sendMessage?chat_id=<Chatid>&parse-mode=Markdown&text=<Your text> || nothing for Save replace the "<Token>" with your actual Telegram Token replace the "<Chatid>" with your actual Telegram Chatid replace the "<Your text>"
Here is an completed example string
Choose the relevant Operating mode and enter the corresponding entries. Only one or both of the On and Off settings are applicable When issuing a Save you may receive more than one message due to size restrictions and this may take a while to run on the watch so be patient until you have received all your settings. Your watch will vibrate for each message portion sent. Setting up Telegram Use the Telegram BotFather to establish your Token and Chatid - see A good starting point
Daikin If you select Daikin as DeviceMake it will pre-fill settings with the appropriate elements to check only. If you want to operate any units use the Daikin Aircon app instead You need to still enter the device name and IP address.
General examples. 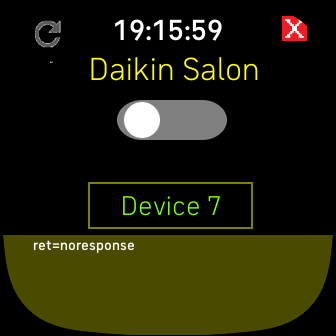 Possibly the IP is wrong 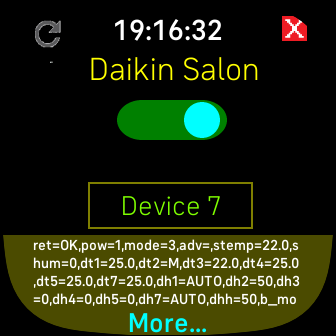 First part of results tap more for rest 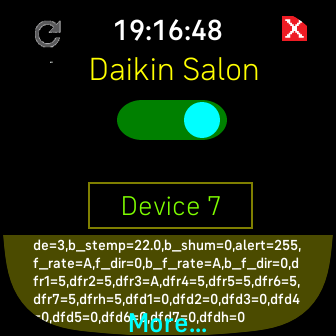 More of the results 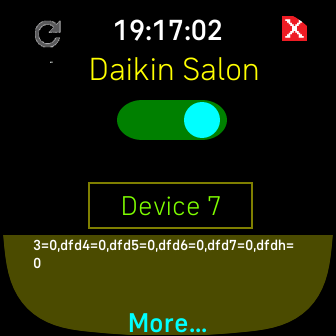 Last part of result tap More to go back to the start 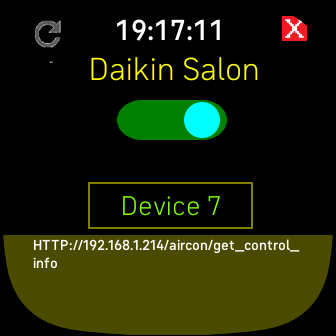 Validate the URL used Tap yellow to switch mode Can be used in a browser for verification SonoffDIY
What can it be used for? You can only check a Sonoff switch if it has been converted to DIY mode or Tasmota first. eWeLink devices are normally handled through their app or Home Assistant otherwise. If you select SonoffDIY as DeviceMake it will pre-fill settings with the appropriate elements to check or switch a device. But you MUST put in the appropriate IP address to replace the model one.
What can it be used for? You can use ANY to access it and set up profiles accordingly. |
SimpleHome releases
(V4 - Versa 2, V5 - Sense, Versa 3,
V4 - Versa, Versa Lite are limited to 16 devices)
Vx.2.xx - tba
-
Import/Export option
-
other enhancements
-
open to suggestions
Vx.3.06 - 2025-05-16
- Full connection monitoring
- Performance inprovements
Vx.2.23 - 2025-05-07
- Storage stability improvements
Vx.2.22 - 2025-04-25
- stay active for 5 minutes and other enhancements
- keep display on for 30 seconds after a change
- local Sonoff support
Vx.1.18 - 2024-08-11
- added More to view full results
Vx.1.18 - 2024-08-05
- added Daikin as a supported make
-
Support for saving your settings in Telegram
Vx.1.11 - 2024-07-15
- Initial release